8 Practical AI Image Combiner Use Cases (With Prompts That Actually Help)
Learn when combining images with AI is useful, what source photos to upload, how to write a clear prompt, and what to check before using the result.
You may already have every visual ingredient you need, just not in the same photo. The product is in a clean catalog shot, the setting is in a location photo, the person is in another frame, and the mood is saved in a reference image. The practical problem is turning those separate references into one scene without spending an afternoon cutting out layers and matching light by hand.
An AI image combiner can help when the sources need to interact inside a newly generated image. It is useful for testing a product scene, bringing people from separate photos into one composition, previewing furniture in a room, or turning scattered creative references into a reviewable concept.
It is not the right tool for every job. If you only want a grid, a side-by-side comparison, or a pixel-perfect edit to an original file, use a collage or layer-based editor instead. This guide explains where AI image fusion is genuinely useful, what to upload, what to write, and what to inspect before you publish the result.
Reviewed and updated: August 10, 2026
Author: YuzuTime Editorial Team
Editorial scope: This guide focuses on planning and creating visual concepts. AI-generated results can change faces, product details, text, colors, materials, or proportions, so check important details against the original images.
Image disclosure: The examples in this article are AI-created editorial illustrations of the workflows described. They are not unedited output benchmarks or a promise that every source image will produce the same result.
First, Decide Whether You Need AI Fusion or a Collage
The easiest way to choose is to ask whether the subjects should appear to share the same physical scene.
| Your goal | Better starting point |
|---|---|
| Put photos next to each other without changing them | Collage maker |
| Preserve every original pixel and arrange layers manually | Layer-based photo editor |
| Remove one background and keep a transparent cutout | Background remover |
| Place a product, person, or object naturally into another scene | AI image combiner |
| Combine a subject, setting, prop, and visual style into one concept | AI image combiner |
AI fusion generates a new image. That flexibility is its advantage, but it also means the result is an interpretation of your references—not a guaranteed pixel-for-pixel composite.
A Simple Setup That Works for Most Combinations
Before looking at individual use cases, give every uploaded image one clear job:
- Image 1 — main subject: the product, person, pet, or object that matters most.
- Image 2 — base scene: the room, landscape, desk, street, or studio where the subject should appear.
- Image 3 — supporting object: a prop, second person, furniture item, or product to include.
- Image 4 — visual direction: lighting, color palette, texture, or photographic style.
You do not have to use four images. Two compatible, high-quality references are often easier to control than four conflicting ones.
A useful prompt answers four questions in order:
Use what? Place the product from Image 1 in the room from Image 2.
Put it where? Position it on the table, slightly right of center.
Keep what unchanged? Preserve the package shape, logo placement, and colors.
Match what? Match the camera angle, warm window light, scale, and contact shadows.
You can apply this structure to almost every workflow below.
1. Turn a Plain Product Photo Into a Lifestyle Image
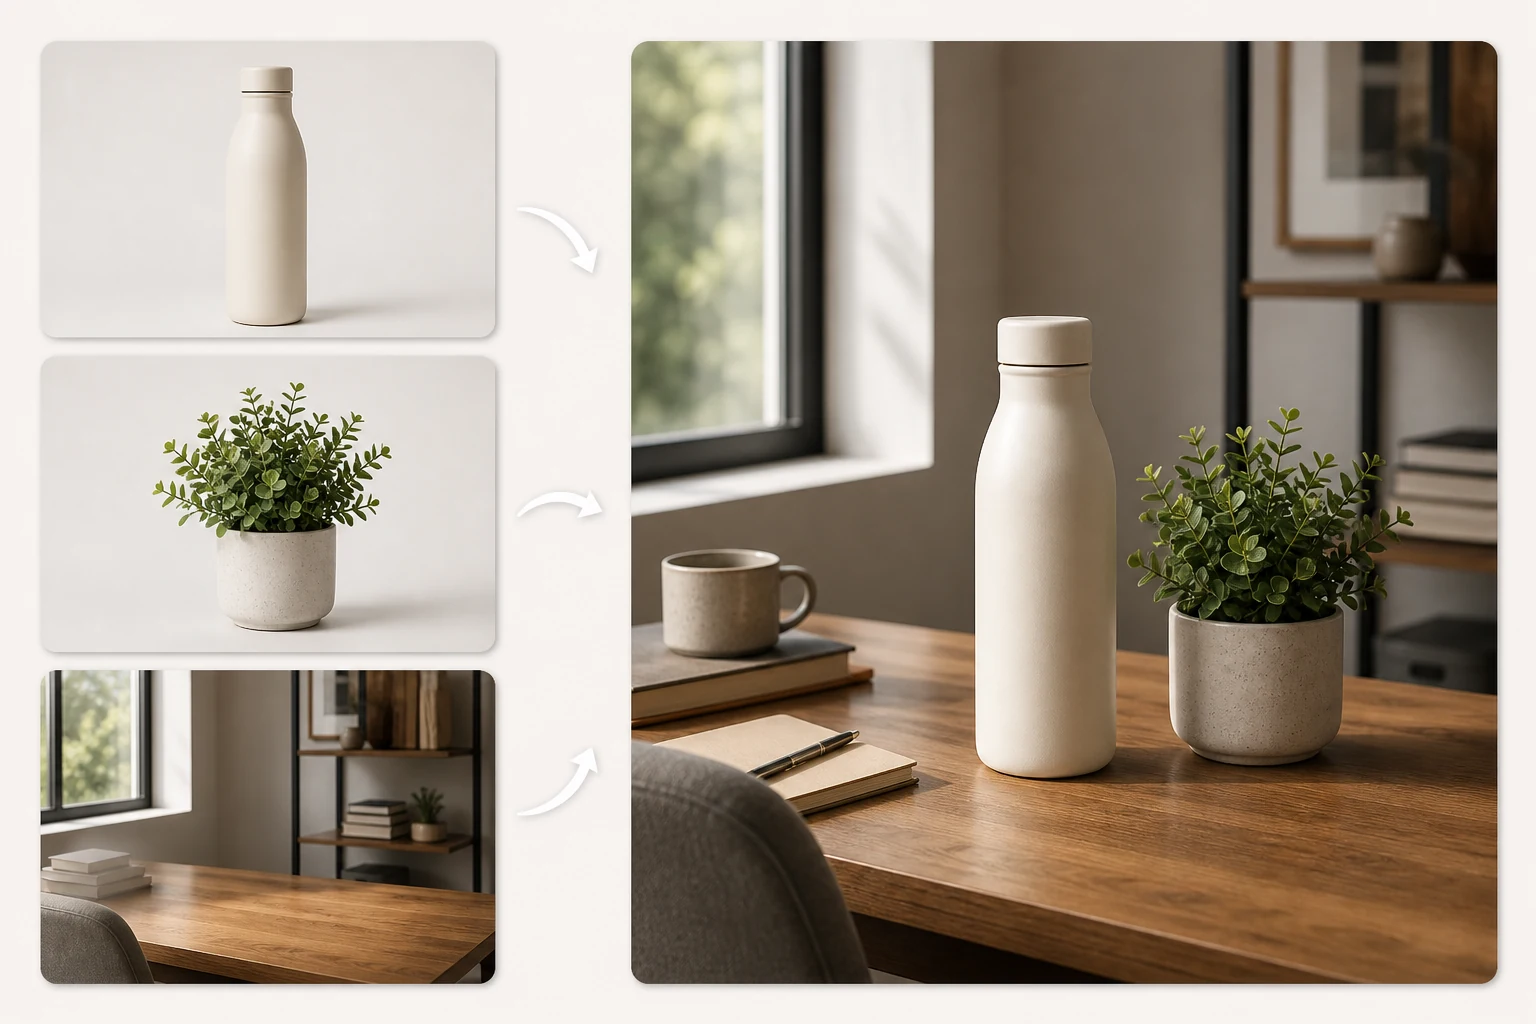
This is useful when you have an accurate product photo but need secondary images for a product page, social post, email, or campaign draft. Instead of asking AI to invent the product, use the real product photo as the main reference and generate the scene around it.
Upload:
- A sharp, evenly lit product photo
- A background or room reference
- Optional props or lighting reference
Prompt example:
Place the cream bottle from Image 1 on the wooden desk in Image 2. Add the plant from Image 3 behind the bottle without covering it. Preserve the bottle shape, cap, color, and proportions. Match the warm window light, camera height, depth of field, and contact shadows.
Check before use: Compare the generated product with the original at full size. Look for changed label text, shifted colors, bent edges, missing parts, or unrealistic reflections. For an online store, keep an accurate real photo as the primary listing image and use generated lifestyle scenes as supporting visuals unless you have verified every material detail.
Try this workflow in the YuzuTime AI Image Combiner, which accepts up to four source images in one generation.
2. Create Seasonal or Platform-Specific Campaign Variations
One photoshoot rarely produces every format and seasonal setting a small team needs. A product can remain the main reference while the environment changes from a neutral studio to a summer table, autumn desk, or holiday gift scene.
This works best when you change one creative variable at a time:
- Keep the product and composition, change only the season.
- Keep the scene, change the output ratio for a vertical post or wide banner.
- Keep the product and lighting, replace only the supporting props.
Prompt example:
Create a vertical social image using the product from Image 1 and the tabletop composition from Image 2. Add only the subtle winter greenery from Image 3. Keep the product unobstructed and preserve its shape and colors. Leave clear space above the product for copy that will be added later in a design tool.
Add headlines and prices afterward in a design editor. Generative models can distort small type, and regenerating the entire image just to change a sentence wastes time.
3. Build Product Bundles and Styled Flat Lays
If separate products need to appear as one gift set, routine, or collection, upload a clean image of each item and describe their relative positions. This can help you test a composition before arranging and photographing the real products.
Upload: two or three product photos plus an optional surface reference.
Prompt example:
Arrange the three products from Images 1, 2, and 3 as a balanced top-down skincare routine on the pale stone surface from Image 4. Keep every container upright, separated, and fully visible. Preserve each product's shape, relative size, cap, and color. Use soft shadows from the upper left.
The most common mistake is leaving the scale unspecified. If one item is 10 cm tall and another is 25 cm tall, state that relationship or show the items together in one reference photo.
4. Put Two People From Separate Photos Into One Scene
This can help when two people were photographed separately, or when someone was absent from a casual group photo. The difficult part is not simply placing both faces in the frame—it is making body scale, eye level, light direction, clothing, and ground contact feel consistent.

Choose source photos with:
- Similar camera height and head angle
- Enough visible body area for the planned composition
- Clear facial details without heavy filters
- Lighting that is not strongly contradictory
Prompt example:
Place the people from Images 1 and 2 walking side by side in the park from Image 3. Preserve their recognizable facial features, hairstyles, clothing, and approximate height difference. Match their eye level, late-afternoon light, depth of field, and shadows on the path. Keep their hands natural and visible.
Only upload photos you own or have permission to use. Do not present an AI-created event as documentary evidence, and avoid using another person's likeness in a misleading or harmful context.
5. Move a Portrait Into a More Useful Background
Sometimes the person is already photographed well, but the background is distracting or does not fit the intended use. A new setting can turn the same source portrait into a travel concept, editorial image, profile-photo direction, or campaign draft.
For a natural result, specify what must stay recognizable and what the new scene needs to match:
Place the person from Image 1 on the city street in Image 2. Preserve facial features, hairstyle, expression, jacket, and body proportions. Match the street's evening light, camera angle, reflections, and shallow depth of field. Do not add accessories or change the person's clothing.
If the original portrait is tightly cropped at the shoulders, do not immediately ask for a full-body result. The model would have to invent most of the body and clothing. Choose an output crop that the source can support.
6. Preview Furniture and Decor in a Room
An AI image combiner can turn an empty-room photo and separate furniture references into a quick planning image. This is useful for comparing a sofa color, table shape, lamp, or decor direction before buying or building a more exact mockup.

Prompt example:
Place the green sofa from Image 2 against the long wall in the empty room from Image 1. Put the round oak table from Image 3 in front of it. Preserve the room layout, windows, floor, camera position, sofa color, and table shape. Match scale, perspective, daylight, and floor shadows.
Treat the result as a visual preview, not a measurement tool. AI may make furniture narrower, move walls, or change clearances. Check the real room and product dimensions before making a purchase decision.
7. Explore an Outfit or Styling Direction
Multiple references can help you explore how a jacket, shoes, bag, color palette, pose, and location might work together. This is particularly useful for creating a moodboard that looks closer to a finished photograph than a set of disconnected screenshots.
Assign references carefully:
- Image 1: person and identity
- Image 2: garment or outfit direction
- Image 3: pose or framing
- Image 4: setting and light
Ask the model to preserve identity, body proportions, and any garment details that matter. Still, do not use the result to judge exact sizing, fit, fabric behavior, or color accuracy. Those require a real try-on or a specialized workflow with stronger garment controls.
8. Turn a Moodboard Into a Reviewable Creative Concept
A normal moodboard communicates ingredients: a location, palette, pose, prop, and lighting reference. The viewer still has to imagine how they might work together. AI fusion can create a first-pass composition that is easier for a client or teammate to review.
This is useful for:
- Advertising and social campaign drafts
- Poster and thumbnail directions
- Editorial portrait concepts
- Packaging-in-context previews
- Art, texture, and color studies
Be explicit about which reference controls which property:
Use the composition from Image 1, the warm directional lighting from Image 2, and the paper texture and muted color palette from Image 3. Keep the main subject and all major shapes from Image 1 unchanged. Do not add new objects or text.
The result does not need to be the final asset to be useful. A good concept image can help a team choose a direction before investing in photography, retouching, or production.
How to Get a More Natural Combined Image
Start with compatible source images
Choose images with enough resolution and visible detail. Similar camera angles are easier to reconcile than a top-down product shot and an eye-level room photo. Similar light direction also reduces the amount the model has to reinterpret.
Describe relationships, not just objects
“Combine these images” leaves important decisions open. Say where objects belong, what sits in front or behind, how large each subject should be, and whether people should look at the camera or interact with something.
State preservation requirements
Name the details that must remain recognizable: face, hairstyle, garment, package shape, logo position, material, color, furniture silhouette, or room geometry. Keep the list focused on what actually matters.
Match the output ratio to the destination
Choose the format before generating when possible: square for many product cards, 4:3 or 3:2 for editorial images, 16:9 for banners, and 9:16 for vertical social content. A late crop may remove a person or make a product feel cramped.
Revise one problem at a time
If the first result is close, do not rewrite the entire prompt. Make one correction such as “keep the bottle label rectangular,” “reduce the sofa by 15%,” or “match the light from the left.” Smaller revisions make it easier to understand what improved the image.
Check the Result Before You Publish It
Zoom in instead of judging only the thumbnail.

Use this final checklist:
- Identity: Do faces, hairstyles, and body proportions still resemble the references?
- Product accuracy: Are shape, color, parts, labels, and logos intact?
- Geometry: Do furniture, walls, and objects have plausible proportions?
- Light: Do highlights and shadows point in the same direction?
- Contact: Do feet, furniture, and products sit on the surface instead of floating?
- Reflections: Do glass, metal, mirrors, and glossy surfaces agree with the scene?
- Hands and edges: Are fingers, straps, hair, and object boundaries natural?
- Context: Could the image mislead someone about a real person, event, product, or property?
If accuracy is essential, return to the original photo for the primary evidence and treat the AI version as a concept or supporting image.
When an AI Image Combiner Is Not the Best Choice
Use a different tool when:
- You need an unchanged side-by-side comparison.
- Every product label and pixel must remain exact.
- You need precise room measurements or architectural planning.
- You only need to remove a background.
- You need a legally reliable record of an event or condition.
- You do not have permission to use the people, products, artwork, or locations in the source images.
The most effective workflow is often mixed: use AI fusion to explore the composition, then use a conventional editor for typography, exact brand colors, and final retouching.
A Practical Starting Point
For your first attempt, choose one clear subject and one compatible scene. Write a prompt that identifies each image by number, describes placement, lists two or three details to preserve, and requests matching light, scale, and shadows. Generate one result, inspect it at full size, and revise only the most visible problem.
Open the AI Image Combiner when you have your references ready. The goal is not to ask AI to make every decision; it is to give each image a clear role so the model has fewer reasons to guess.
Sources and Editorial Method
This article combines YuzuTime's current image-combining workflow with observed use cases from ecommerce and multi-reference image tools. Community reports are treated as practical experience rather than controlled research, which is why the recommendations emphasize checking generated details against original source files.
Related YuzuTime tools
AI Image Combiner
Upload up to four images, assign each one a role, and generate a unified scene from your references.
AI Photo Editor
Refine a generated result, change a distracting detail, or make a focused prompt-based edit.
AI Background Remover
Isolate a subject before combining it when the original background is distracting or difficult to preserve.